
Do you wonder how to use the DockerOperator in Airflow to kick off a docker image? Or how to run a task without creating dependency conflicts? In this tutorial, you will discover everything you need about the DockerOperator with practical examples. If you’re new to Airflow, I’ve created a course you can check out here. Ready? Let’s go!
Why the DockerOperator?
As you may know, Airflow has many operators to perform actions on different tools, systems, etc. The idea behind the operators is to abstract the complexity of achieving a specific task. For example, running a SQL request on Postgres means creating a connection, and a cursor, instantiating and configuring some objects, running the SQL query, and so on. However, the biggest drawback of operators is the need to familiarize yourself with their interfaces and implementations.
Another common challenge with operators and tasks is the need to install dependencies that can conflict with existing dependencies installed on your Airflow instance. For example, you might have a task that needs pandas 1.5.2, whereas pandas 2 is already installed. If you try to run the task, you will get an error with a dependency conflict.

For those reasons, the DockerOperator comes as a savior!
What is the DockerOperator?
The DockerOperator allows you to run Docker Containers that correspond to your tasks, packed with their required dependencies and isolated from the rest of your Airflow environment. The result of the DockerOperator depends on the command and the script it runs in the Docker Container.
Here is an example of a DAG using the DockerOperator:
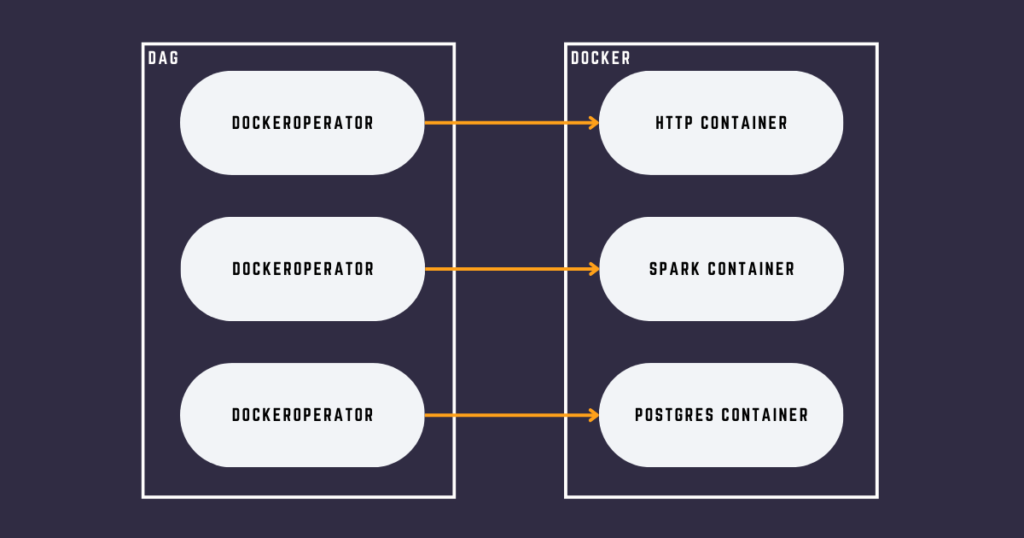
Each task runs a Docker Container that contains a script to perform an action isolated from the other tasks of the DAG.
There are many advantages of running tasks in containers:
Dependency Management
The most significant advantage of the DockerOperator and any other container-based operators is that it provides an easier way of managing dependencies. Creating specific images for each task allows you to embed the dependencies that each task needs. Since tasks operate independently within these images, dependency conflicts between them are eliminated. Furthermore, there’s no need to set up task dependencies in the Airflow workers.
Enhanced Testability
Testing your tasks can be tedious. Defining your tasks in Docker images provides an easier way to test them. Indeed, instead of testing an Airflow task, you test a Python script or your application. You’re back to the usual development life cycle and software engineering best practices.
Unified Experience
With the DockerOperator, each task uses the same interface – the same operator. Learning other operators is unnecessary, making developing and maintaining DAGs easier. Does that mean you should use the DockerOperator only? I don’t think so, but it’s up to you 😉
How does it work?
The DockerOperator performs the equivalent of the docker run command with a specific Docker Image (your task) and some arguments. Then it waits until the Docker Container (your running task) is done and returns the last line printed on the standard output as an XCOM.
Here is the step-by-step process:
- The Scheduler schedules the task and sends it to the Executor.
- The Airflow Worker takes the task and executes
docker run your_image your_arguments. - If needed, Docker fetches the Docker Image (your task) from the registry (where images are stored)
- Docker creates the Docker Container and mounts volumes, if any.
- The Docker Container succeeds or fails (your task).
- The DockerOperator succeeds or fails and returns the last line printed by the Docker Container as an XCOM.
How to use the DockerOperator
We will use the DockerOperator in this example to run a Spark job. This example is part of my Airflow course that you will find here.
Suppose you have the following Python script to transform data coming from a bucket and store the result as a CSV file in that same bucket using PySpark:
# Import the SparkSession module
from pyspark.sql import SparkSession
from pyspark import SparkContext
from pyspark.sql.functions import explode, arrays_zip, from_unixtime
from pyspark.sql.types import DateType

import os
import sys

if __name__ == '__main__':

    def app():
        # Create a SparkSession
        spark = SparkSession.builder.appName("FormatStock") \
            .config("fs.s3a.access.key", os.getenv("AWS_ACCESS_KEY_ID", "minio")) \
            .config("fs.s3a.secret.key", os.getenv("AWS_SECRET_ACCESS_KEY", "minio123")) \
            .config("fs.s3a.endpoint", os.getenv("ENDPOINT", "http://host.docker.internal:9000")) \
            .config("fs.s3a.connection.ssl.enabled", "false") \
            .config("fs.s3a.path.style.access", "true") \
            .config("fs.s3a.attempts.maximum", "1") \
            .config("fs.s3a.connection.establish.timeout", "5000") \
            .config("fs.s3a.connection.timeout", "10000") \
            .getOrCreate()

        # Read a JSON file from an MinIO bucket using the access key, secret key,
        # and endpoint configured above
        df = spark.read.option("header", "false") \
            .json(f"s3a://{os.getenv('SPARK_APPLICATION_ARGS')}/prices.json")

        # Explode the necessary arrays
        df_exploded = df.select("timestamp", explode("indicators.quote").alias("quote")) \
            .select("timestamp", "quote.*")

        # Zip the arrays
        df_zipped = df_exploded.select(arrays_zip("timestamp", "close", "high", "low", "open", "volume").alias("zipped"))
        df_zipped = df_zipped.select(explode("zipped")).select("col.timestamp", "col.close", "col.high", "col.low", "col.open", "col.volume")
        df_zipped = df_zipped.withColumn('date', from_unixtime('timestamp').cast(DateType()))

        # Store in Minio
        df_zipped.write \
            .mode("overwrite") \
            .option("header", "true") \
            .option("delimiter", ",") \
            .csv(f"s3a://{os.getenv('SPARK_APPLICATION_ARGS')}/formatted_prices")

    app()
    os.system('kill %d' % os.getpid())
This Python script is the task you want to run with the DockerOperator. Therefore, the first step is to build a Docker Image with that script.
For that, you need a Dockerfile:
FROM bde2020/spark-python-template:3.3.0-hadoop3.3

COPY stock_transform.py /app/

RUN wget https://repo1.maven.org/maven2/org/apache/hadoop/hadoop-aws/3.3.2/hadoop-aws-3.3.2.jar \
    && wget https://repo1.maven.org/maven2/com/amazonaws/aws-java-sdk-bundle/1.11.1026/aws-java-sdk-bundle-1.11.1026.jar \
    && mv hadoop-aws-3.3.2.jar /spark/jars/ \
    && mv aws-java-sdk-bundle-1.11.1026.jar /spark/jars/

ENV AWS_ACCESS_KEY_ID minio
ENV AWS_SECRET_ACCESS_KEY minio123
ENV ENDPOINT http://host.docker.internal:9000
ENV SPARK_APPLICATION_PYTHON_LOCATION /app/stock_transform.py
ENV ENABLE_INIT_DAEMON false
ENV SPARK_APPLICATION_ARGS "stock-market/AAPL/"
Notice the command COPY stock_transform.py /app/ that copies the Python script into the Docker Image.
With the Dockerfile and your script, the next step is to run: docker build . -t image_name
That command builds a Docker Image based on the Dockerfile above. It downloads the dependencies, copies the files, runs commands, defines the environment variables, etc. Once the build is done, the Docker Image is stored in your local registry. In production, it will be a service like AWS ECR.
The final step is to install the Airflow Docker Provider: apache-airflow-providers-docker to get access to the DockerOperator. Then if your DAG, create a task with the Operator:
my_task = DockerOperator(
  task_id='my_task',
  image='my_image',
  container_name='my_task',
  api_version='auto',
  auto_remove=True,
  docker_url='tcp://docker-proxy:2375',
  network_mode='container:spark-master',
  tty=True,
  xcom_all=False,
  mount_tmp_dir=False,
  environment={
  'SPARK_APPLICATION_ARGS': '{{ task_instance.xcom_pull(task_ids="store_prices") }}'
        }
)
Let me give you a quick explanation. This task my_task runs a Docker Container with the Docker Image my_image and the container name my_task. If the image does not exist, Docker will download it, which increases the execution time of the task. If you have an SLA, keep this in mind. The Docker Container uses the following docker url tcp://docker-proxy:2375 , another service to connect to the Docker daemon (this example runs in docker-compose). Then we ensure it shares the same network as the Docker container running Spark. Remember that the task is a Python script that transforms data with PySpark, so Spark and the task must be able to communicate. auto_remove=True automatically removes the Docker Container once the task is completed (regardless of the result). Last, we create an environment variable SPARK_APPLICATION_ARGS with a value from an XCom pushed by a task store_prices using templating.
The DockerOperator in action!
Here is a video I made that covers the DockerOperator
Conclusion
As you saw in the example above, running your task with the DockerOperator will give you a Docker Container that runs your script to transform the data with PySpark, without installing Spark on your Airflow Worker. That’s the beauty of the DockerOperator. Dependencies stay at the task level, avoiding conflicts with system-level dependencies or other tasks. In addition, it decouples the development of your tasks and the development of the DAG itself, making the testing process more straightforward.
If you want to use the DockerOperator in a real project context, go check out my course.
Have a great day!