
Wondering how to share data between tasks? What are XCOMs in Apache Airflow? Well, you are at the right place. In this tutorial, you will learn about XComs in Airflow. What they are, how they work, how you can define them, how to get them, and more. If you checked my course “Apache Airflow: The Hands-On Guide”, Aiflow XCom should not sound unfamiliar. At the end of this tutorial, you will have a solid knowledge of XComs and be able to share data between your tasks efficiently. Let’s get started!
Use Case
As usual, starting with a use case is always good to better explain why you need functionality. The Airflow XCom concept is not easy, so let me illustrate why it can be helpful for you. Let’s imagine you have the following data pipeline:
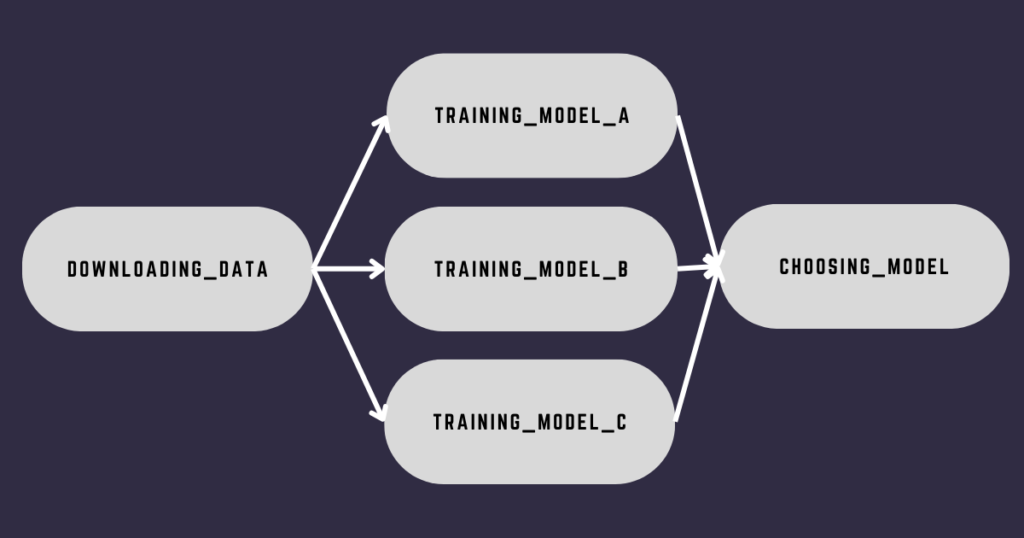
In a nutshell, this data pipeline trains different machine learning models based on a dataset and the last task selects the model with the highest accuracy. The question is,
How can we get the accuracy of each model in the task choosing_model to pick the best one?
One solution could be to store the accuracies in a database and fetch them back in the task choosing_model with an SQL request. That’s perfectly viable, but is there any native and easier mechanism in Airflow allowing you to do that?
Yes! XComs!
What is an Airflow XCOM?
XCom stands for “cross-communication” and allows data exchange between tasks. You can think of an XCom as a little object with the following fields:

- A key: This is the identifier of an XCom. It doesn’t have to be unique. You use the key to retrieve the XCom.
- A value: This is what you want to share. That value must be serializable in JSON or pickable. Serializing with pickle has been disabled by default to avoid RCE exploits/security issues. If you want to learn more about the differences between JSON/Pickle, click here.
- A timestamp: When the XCom was created.
- An execution date/Logical date: That date corresponds to the execution date/logical date of the DAG run having generated the XCom. That’s how Airflow avoids fetching an XCom coming from another DAG run. You don’t know what I’m talking about? Check my video about how scheduling works in Airflow.
- A task id: The identifier of the task that creates the XCom.
- A dag id: The identifier of the DAG that creates the XCom.
Keep in mind that Airflow stores XComs in the database. That has some implications that you will see later in this tutorial.
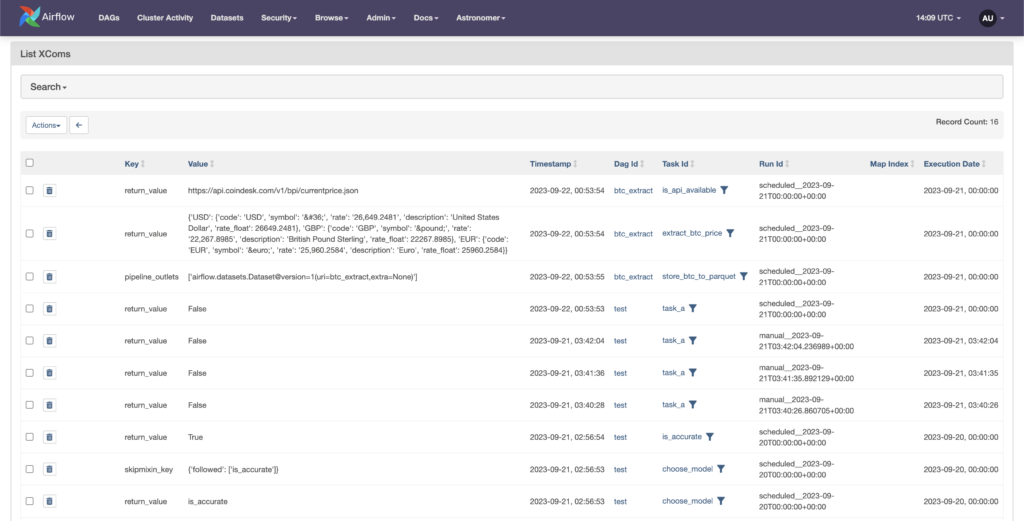
To access XComs, go to the user interface, then Admin and XComs.
Great! Now you know what an XCom is, let’s create your first Airflow XCom!
How to use XCom in Airflow?
Time to practice. Here is the data pipeline we will use:
from airflow import DAG
from airflow.operators.bash import BashOperator
from airflow.operators.python import PythonOperator
from random import uniform
from datetime import datetime

def _training_model():
  accuracy = uniform(0.1, 10.0)
  print(f"model's accuracy: {accuracy}")

def _choose_best_model():
  print('choose best model')

with DAG('xcom_dag',
  start_date=datetime(2023, 1, 1),
  schedule='@daily',
  catchup=False):

  downloading_data = BashOperator(
    task_id='downloading_data',
    bash_command='sleep 3'
  )

  training_model_task = [
    PythonOperator(
      task_id=f'training_model_{task}',
      python_callable=_training_model
    ) for task in ['A', 'B', 'C']
  ]

  choose_model = PythonOperator(
    task_id='choose_model',
    python_callable=_choose_best_model
  )

downloading_data >> training_model_task >> choose_model
Create a file xcom_dag.py and put the code in it. You should obtain the following DAG:
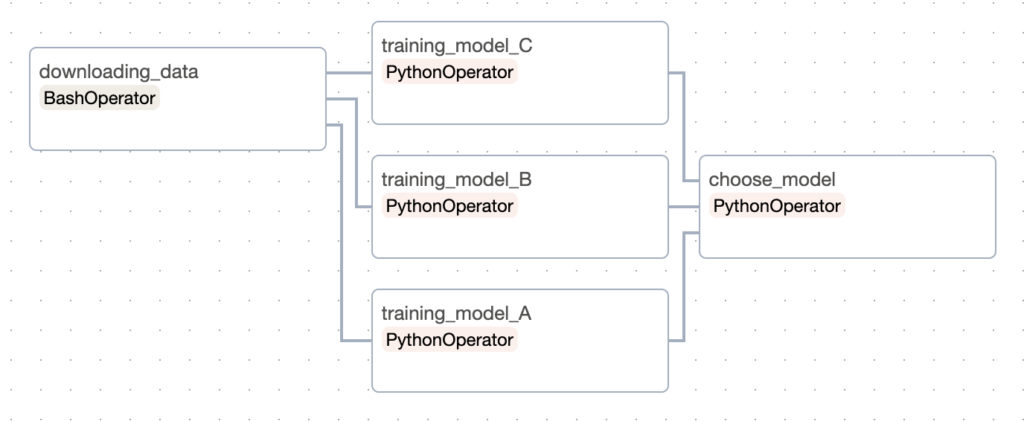
The data pipeline is simple. There are five tasks. downloading_data uses the BashOperator to execute a bash command that waits for three seconds. Then we dynamically create three tasks, training_model_[A,B,C] with a list comprehension. Each task uses the PythonOperator to execute the function _training_model. That function randomly generates an accuracy for each model A, B, and C. Finally, we pick the best model based on the generated accuracies in choose_model.
The objective is to create one XCom for each model and fetch the XComs back in the task choose_model to select the best model.
How? Two steps:
- Create an XCom for each training_model task.
- Pull the XComs in
choose_model
Let’s do it!
How to push an Airflow XCOM
In this Airflow XCom example, we will push an XCom for each model A, B, and C with their corresponding accuracy.
There are different ways to create an XCom but let’s begin with the most basic one: by returning a value. With the PythonOperator, we can use the keyword return along with the value in the Python callable function to push the value we want to share into the database and create the corresponding XCom automatically.
def _training_model(ti):
  accuracy = uniform(0.1, 10.0)
  print(f"model's accuracy: {accuracy}")
  return accuracy # here
If you trigger the DAG and go to Admin and XComs, you will see that:

Well done! With just one line of code, you’ve pushed your first XComs!
The important part here is the key, return_value. By default, when you push an XCom with return, Airflow assigns the key return_value to it. In addition, you can see that each XCom was created from different tasks (based on the task ids). However, there is something weird here. We don’t return any value from the task downloading_data but we have an XCom that comes from it.
Why? 😲
The do_xcom_push argument
By default, any operator that returns a value creates an XCom. To know which one, you have to look into the code but there is one parameter that operators have in common: do_xcom_push. That parameter controls whether or not an Operator should push an XCom by default. If we change this parameter to False.
downloading_data = BashOperator(
  task_id='downloading_data',
  bash_command='sleep 3',
  do_xcom_push=False
)
Then, clear all XComs and trigger the DAG again.

Now it’s gone.
As an exercise, you can use the same parameter to False with the PythonOperator. If you trigger the DAG, you will have no XComs at all this time.
The xcom_push example
The simplest way to create an XCom is by returning a value from an operator. We know that, and we know that we can change that behavior with do_xcom_push. By the way, remember that all operators do not return XComs. Therefore, it depends on the implementation of the operator you use.
Is there another way to create an XCom? A way that allows more customization like to specify the key? Yes, there is! With the method xcom_push.
First thing first, xcom_push is accessible only from a task instance object. With the PythonOperator you can access it by passing the parameter ti to the Python callable function. In Airflow 1.10.x, we had to use ,provide_context but since Airflow 2.0, it’s over.
def _training_model(ti):
  accuracy = uniform(0.1, 10.0)
  print(f'model\'s accuracy: {accuracy}')
  return accuracy
With the Taskflow API (which is the new way of authoring DAGs) it’s almost the same way.
@task
def training_model(ti=None):
  accuracy = uniform(0.1, 10.0)
  print(f'model\'s accuracy: {accuracy}')
  return accuracy
Notice the parameter ti. Once we access the task instance object, we can call xcom_push.
xcom_push expects two parameters:
- A key: To identify the XCom
- A value: The data to share. Must be JSON serializable or picklable.
To push the accuracy with xcom_push you can do the following
def _training_model(ti):
  accuracy = uniform(0.1, 10.0)
  print(f'model\'s accuracy: {accuracy}')
  ti.xcom_push(key='model_accuracy', value=accuracy)
Or with the Taskflow API
@task
def training_model(ti=None):
  accuracy = uniform(0.1, 10.0)
  print(f'model\'s accuracy: {accuracy}')
  return {"model_accuracy": accuracy} # xcom_push is implicitly called
If you trigger the DAG again, you get three XComs with the same key, model_accuracy as specified in xcom_push. By the way, when you execute twice your DAG on the same execution date, the XComs created on the first DAGRun get overwritten with the ones created on the second DAGRun.
That’s it! That’s all you need to know about xcom_push.
The (almost) useless parameter
One additional parameter in xcom_push that I didn’t talk about is execution_date. By specifying a date in the future, XCom won’t be visible until the corresponding DAG run is triggered. To be honest, I never found any use case for this, but at least you know that it’s possible 😅
The xcom_pull example
Once the data has been pushed into the database using xcom_push, how do we retrieve it? That’s the purpose of xcom_pull.
Like xcom_push, this method is available through a task instance object, and it expects two parameters:
- task_ids, only XComs from tasks matching the ids will be pulled
- key, only XComs with the matching key will be pulled
Two things to remember here. First, you can retrieve multiple XComs at once by passing a list of task ids to task_ids. Second, you have to pass a key to retrieve the corresponding XCom. Let’s pull our first Airflow XCom.
def _choose_best_model(ti):
  fetched_accuracy = ti.xcom_pull(key='model_accuracy', task_ids='training_model_A')
  print(f'choose best model: {fetched_accuracy}')
In the code above, we pull an XCom with the key model_accuracy created from the task training_model_A. Trigger your DAG, click on the task choose_model , and logs. You will see:
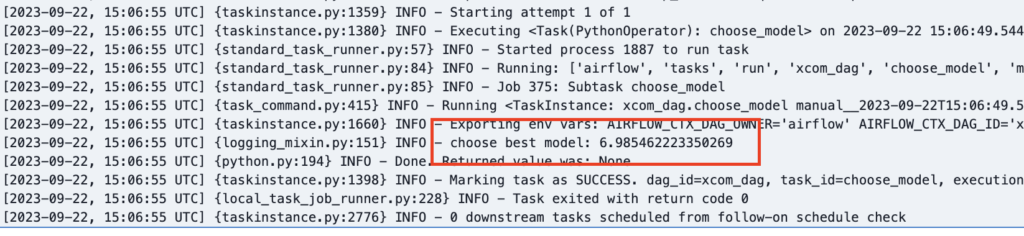
Well done, you have successfully pulled the accuracy stored in an XCom created by the task training_model_A from the task choosing_model! (Notice that the value will be different for you).
How to pull XComs from multiple tasks
At this point, we can share data between tasks in Airflow! Great! But we can do more. What if instead of pulling data from one task, you want to do it from training_model_[A,B,C] to pick the best model?
Simple! You need to specify the task ids in xcom_pull.
def _choose_best_model(ti):
  fetched_accuracies = ti.xcom_pull(key='model_accuracy', task_ids=['training_model_A', 'training_model_B', 'training_model_C'])
  print(f'choose best model: {fetched_accuracies}')
If you trigger the DAG again, you will get three accuracies on the standard output. To pull data from different tasks simultaneously, pass a list of task ids instead of one task id.
The BashOperator xcom_push
The BashOperator executes bash commands or bash scripts. By default, the BashOperator pushes an XCom corresponding to the last line printed on the standard output by those bash commands. Remember that the parameter do_xcom_push controls that behavior.
If you run the following task:
downloading_data = BashOperator(
  task_id='downloading_data',
  bash_command='echo "Hi there, I am an XCOM"',
  do_xcom_push=True
)
You will see that:

Now you know how to push an XCom with the BashOperator, what if you want to pull data from it?
The BashOperator xcom_pull
Pulling an Airflow XCom from the BashOperator is a bit more complex. This time, you need to use the Jinja Template Engine because you can’t execute a Python function to access the task instance object. Indeed, since the parameter bash_command is templated, you can render values at runtime with it.
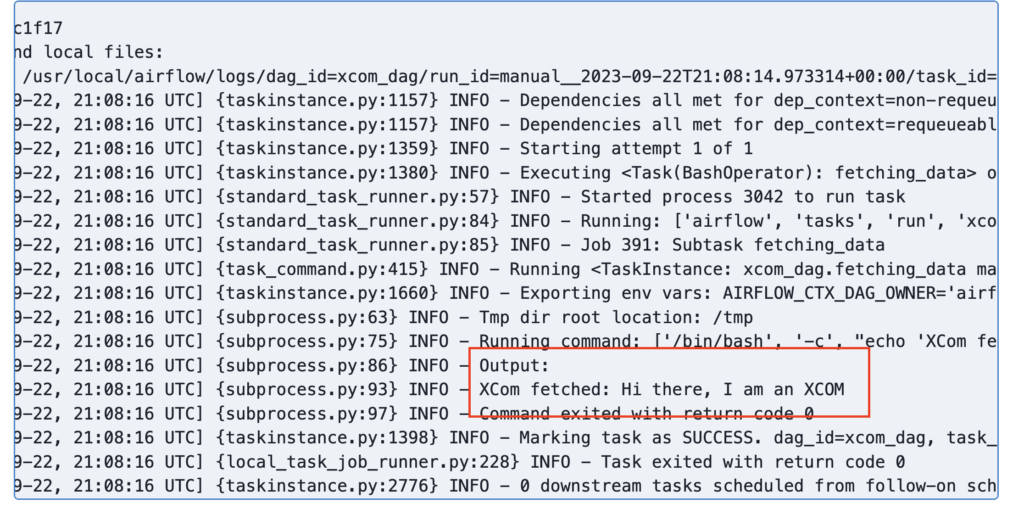
fetching_data = BashOperator(
  task_id='fetching_data',
  bash_command="echo 'XCom fetched: {{ ti.xcom_pull(task_ids=[\'downloading_data\']) }}'",
  do_xcom_push=False
)
The magic happens between the two pairs of curly brackets {{}}. That indicates to the Jinja Template Engine that a value should be rendered here at runtime. In this case, xcom_pull will be replaced by the XCom pushed by the task downloading_data. Notice that I didn’t specify a key here. Why? Because the key of the XCom returned by downloading_data is return_value, and by default, xcom_pull retrieves an XCom with the key return_value if none is given.
Add this task after downloading_data and define the dependency accordingly (downloading_data >> fetching_data) and you will get:
Most of the time, you will have to use Jinja to pull data from most Operators.
XCom limitations
Airflow is NOT a processing framework. It is not Spark or Flink. Airflow is an orchestrator, and it is the best orchestrator. There are no optimizations to process big data in Airflow or a way to distribute it (unless you use some mechanisms). If you try to share a large volume of data between your tasks, you might have a memory overflow error! Oh, and do you know that Airflow XComs have a limited size?
That depends on the database you use!
- SQLite: 2 Gb
- Postgres: 1 Gb
- MySQL: 64 KB
Yes, 64 Kilobytes for MySQL! Again, use XComs only for sharing small amounts of data (unless you use XCom Backends, but that’s another story 😉)
One last point: don’t forget that XComs create implicit dependencies between tasks that may not be visible in the UI.
XCom in practice
Conclusion
That’s it about Airflow XComs. I hope you enjoyed what you’ve learned. Other topics about XComs are coming soon ( I know, I didn’t talk about XCom backends and XComArgs 😉) . If you want to learn more about Airflow, check out my course, The Complete Hands-On Introduction to Apache Airflow. And if you already know Airflow and discover advanced topics, here is my 12 hours course.
Have a great day! 🙂