

Looking to create your first Airflow DAG? Wondering how to process data in Airflow? What are the steps to code your data pipelines? You’ve come to the right place! At the end of this short tutorial, you will have your first Airflow DAG! You might think starting with Apache Airflow is hard, but it is not. The truth is Airflow has so many features that it can be overwhelming. But don’t worry, you will discover only what you need to start now! Before jumping in, if you want a solid and complete introduction to Airflow, check out my course here; you will enjoy it 😀 . Ready? Are you sure? Let’s go!
Use Case
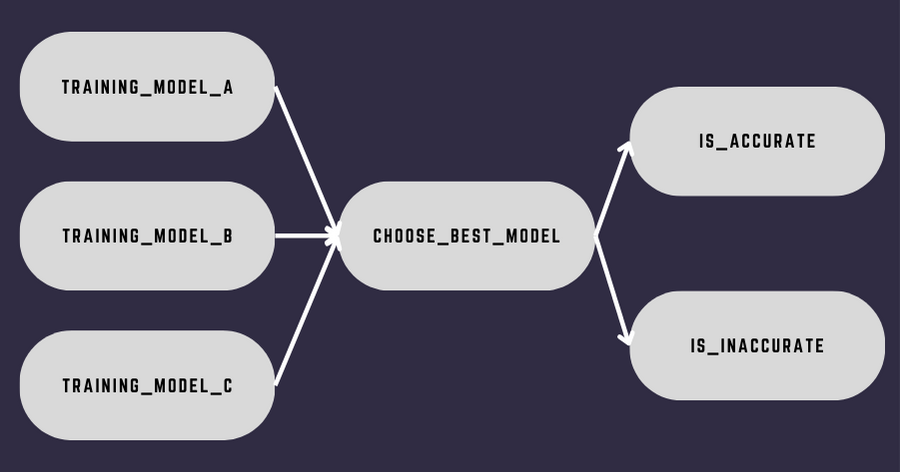
Let’s begin with a use case. Imagine you want to create the following data pipeline:

Your goal is to train three different machine learning models, then choose the best one and execute either is_accurate or is_inaccurate based on the accuracy score of the best model. You could store the value in a database, but let’s keep things simple. Now, the first question that comes up is:
How can I create an Airflow DAG representing this data pipeline?
Well, this is precisely what you are about to find out now!
Airflow DAG? Operators? Terminologies
Before jumping into the code, you must first get used to some terminologies. I know, the boring part, but stay with me, it is essential.
First and foremost,
What is a DAG?
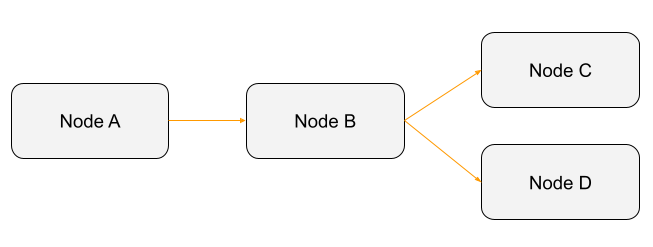
DAG stands for Directed Acyclic Graph. In simple terms, it is a graph with nodes, directed edges, and no cycles. This:
But this:
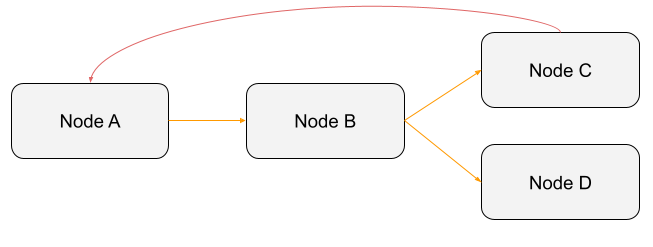
is not a DAG. Why? Because there is a cycle. As Node A depends on Node C, which depends on Node B and itself on Node A, this DAG (which is not) won’t run at all. A DAG has no cycles, never. A DAG is a data pipeline in Apache Airflow. Whenever you read “DAG,” it means “data pipeline.” Last but not least, when Airflow triggers a DAG, it creates a DAG run with information such as the logical_date, data_interval_start, and data_interval_end.
Ok, once you know what a DAG is, the next question is, what is a “Node” in the context of Airflow?
What is an Airflow Operator?
In an Airflow DAG, a node is a task. A task is an Operator. An Operator is an object that encapsulates the logic you want to achieve. For example, if you want to execute a Python function, you can use the PythonOperator. If you want to execute a Bash command, you can use the BashOperator, and so on. Airflow brings plenty of operators that you can find here. When Airflow triggers a task (operator), that creates a Task instance. Here is an example of operators:
from airflow.operators.bash import BashOperator
from airflow.operators.python import Python

...

task_a = PythonOperator(
  task_id='task_a',
  python_callable=my_python_function
)

task_b = BashOperator(
  task_id='task_b',
  bash_command='echo "hello"'
)
An Operator has parameters like the task_id , which is the unique identifier of the task in the DAG. Each task must have a unique task_id. The other parameters to fill in depend on the operator. For example, with the BashOperator, you must pass the bash command to execute. With the PythonOperator, you must pass the Python script or function to execute, etc. To know what parameters your Operator requires, the documentation is your friend 🥹
You know what a DAG is and what an Operator is. Time to understand how to create the directed edges, or in other words, the dependencies between tasks.
Dependencies
A DAG has directed edges. Those directed edges correspond to the dependencies between tasks (operators) in an Airflow DAG. If you want to say “Task A must run before Task B”, you have to define the corresponding dependency. How?
task_a >> task_b
# Or
task_b << task_a
The >> and << respectively mean “right bitshift” and “left bitshift” or “set downstream task” and “set upstream task”. In this example, the first line says that task_b downstream to task_a. The second line says task_a is upstream to task_b. Don’t worry, we will come back to dependencies later in this tutorial.
All right, now you have the terminologies, time to dive into the code! Adios the boring part 👋
Coding your first Airflow DAG
There are 4 steps to create any data pipeline. Let’s go back to our example:
Step 1: Make the imports
The first step is to make some imports. To create a DAG in Airflow, you have to import the DAG class. After the DAG class, come the imports of Operators. Basically, for each Operator you want to use, you have to make the corresponding import. For example, if you want to execute a Python function, you have to import the PythonOperator. If you want to execute a bash command, you have to import the BashOperator. Finally, the last import you need is the datetime class to specify the start date of your data pipeline. When you want to start scheduling it.
from airflow import DAG
from airflow.operators.python import PythonOperator, BranchPythonOperator
from airflow.operators.bash import BashOperator
from datetime import datetime
Step 2: Define the Airflow DAG object
After the imports, the next step is to create the Airflow DAG object. A DAG object has at least two parameters, a dag_id and a start_date. The dag_id is the unique identifier of the DAG across all DAGs. Each DAG must have a unique dag_id. The start_date defines the date at which your DAG starts being scheduled. Warning here.
If the start_date is set in the past, the scheduler will try to backfill all the non-triggered DAG Runs between the start_date and the current date. For example, if your start_date is 3 years ago, you will end up with a lot of DAG runs running at the same time.
In addition to those parameters, two others are usually specified. The schedule (previously schedule_interval) and the catchup arguments.
The schedule_interval defines the trigger interval of your DAG. Every 10 mins, every day, every month, and so on. There are four ways to define it:
- A CRON expression: The most common way. A CRON expression is a way to express time intervals. If you don’t know how to define CRON expressions, look at this website.
- A
timedeltaobject. Useful for intervals such as every three days, four days, and so on. - A Timetable. Useful for very complex schedules.
- A Dataset. Instead of triggering DAGs based on time intervals, it is based on data updates.
For now, let’s focus on CRON expression.
Lastly, the catchup parameter allows you to prevent backfilling non-triggered DAG runs between the start date of your DAG and the current date automatically. If you don’t want to end up with many DAG runs running simultaneously, it’s usually a best practice to set it to False.
That’s it, no more parameters to define, and here is the corresponding code,
with DAG("my_dag", # Dag id
  start_date=datetime(2023, 1 ,1), # start date, the 1st of January 2023
  schedule='@daily', # Cron expression, here @daily means once every day.
  catchup=False
):
To create a DAG instance, we use the context manager with. Why? It’s better to manage your objects and you can create your tasks without having to explicitly attach the dag object to them.
Step 3: Add tasks!
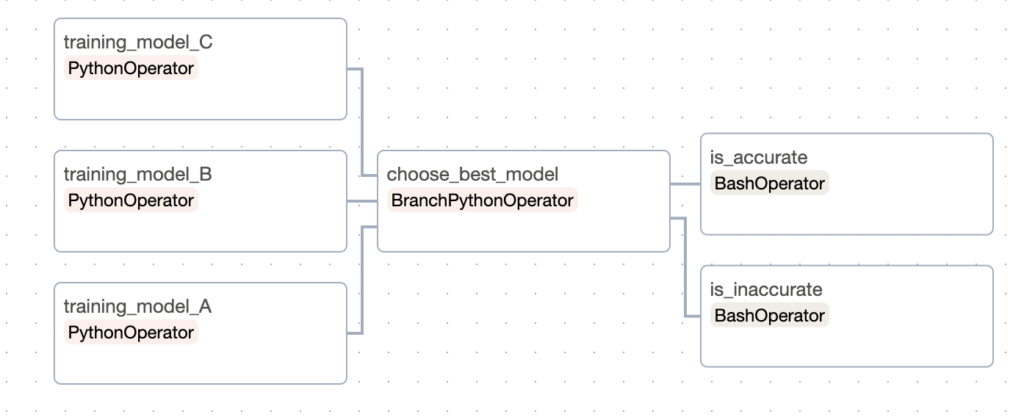
Imports and the DAG object are ready, let’s add those tasks! Remember, a task is an operator. Therefore, based on your DAG, you need to add six operators.
Training model tasks
First, we implement training model A, B, and C, with the PythonOperator. Since we are not going to train real machine learning models (too complicated to start), each task will return a random accuracy. This accuracy will be generated by a Python function called _training_model.
from random import randint # Import to generate random numbers

def _training_model():
  return randint(1, 10) # return an integer between 1 - 10

with DAG(...):

# Tasks are implemented under the dag object
training_model_A = PythonOperator(
  task_id="training_model_A",
  python_callable=_training_model
)

training_model_B = PythonOperator(
  task_id="training_model_B",
  python_callable=_training_model
)

training_model_C = PythonOperator(
  task_id="training_model_C",
  python_callable=_training_model
)
That’s great but we can do better. Indeed, the three tasks are really similar. The only difference lies in the task ids. Therefore, why not generate the tasks dynamically? Take a look at the code below:
training_model_tasks = [

  PythonOperator(
    task_id=f"training_model_{model_id}",
    python_callable=_training_model,
    op_kwargs={
      "model": model_id
     }
  ) for model_id in ['A', 'B', 'C']
]
Using a comprehension list, we can generate three tasks dynamically which is much cleaner. The less code, the better 😎
If you wonder how the PythonOperator works, take a look at my article here, you will learn everything you need about it.
Choosing best model
The next task is choose_best_model. Since this task executes either the task accurate or inaccurate based on the best accuracy, the BranchPythonOperator would be the perfect candidate for that. It allows you to choose what tasks to execute next based on a condition. If you want to learn more about it, take a look here.
How to implement it? Here we go,
def _choose_best_model(ti):
  accuracies = ti.xcom_pull(task_ids=[
    'training_model_A',
    'training_model_B',
    'training_model_C'
  ])
  if max(accuracies) > 8:
    return 'is_accurate'
  return 'is_inaccurate'

with DAG(...):

  choosing_best_model = BranchPythonOperator(
    task_id="choose_best_model",
    python_callable=_choose_best_model
  )
Okay, it’s a bit more complicated so let’s start at the beginning. First, the BranchPythonOperator executes the Python function _choose_best_model. This function returns the task id of the next task to execute. Here, either is_accurate or is_inaccurate. Now, there is one thing we didn’t talk about yet. What is xcom_pull? 😱
When you want to share data between tasks in Airflow, you have to use XCOMs. XCOM stands for cross-communication messages, it is the mechanism to exchange data between tasks in a DAG. An XCOM is an object that has a key, serving as an identifier, and a value, corresponding to the value to share. I won’t go into the details here as I made a long article about it, but keep in mind that by returning the accuracy from the Python function _training_model_X, we create an XCOM with that accuracy, and with xcom_pull in _choose_best_model, we fetch that XCOM. The accuracy value. As we want the accuracy of each training_model task, we specify the task ids of these 3 tasks. That’s all you need to know 😃
Accurate or inaccurate?
The last two tasks to implement are is_accurate and is_inaccurate. To do that, you can use the BashOperator and execute a very simple bash command to either print “accurate” or “inaccurate” on the standard output (simple for now).
is_accurate = BashOperator(
   task_id="is_accurate",
   bash_command="echo 'accurate'"
)

is_inaccurate = BashOperator(
  task_id="is_inaccurate",
  bash_command="echo 'inaccurate'"
)
That’s it, nothing more to add. The BashOperator executes bash commands and that’s exactly what you’re doing here.
All right, that was a lot, time to move to the last step!
Step 4: Define dependencies
Now you’ve implemented all of the tasks, the last step is to put the glue between them or in other words, define the dependencies between them. How? By using bitshift operators.
In your case, it’s really basic, as you want to execute one task after the other.
with DAG(...) as dag:

  training_model_tasks >> choosing_best_model >> [is_accurate, is_inaccurate]
Here you say that training_model_tasks are executed first, then once all of the tasks are completed, choose_best_model runs, and finally, either is_accurate or is_inaccurate. Keep in mind that each time you have multiple tasks that must be executed simultaneously, use a list with [ ].
The Final Airflow DAG
Ok, now you’ve gone through all the steps, time to see the final code:
from airflow import DAG
from airflow.operators.python import PythonOperator, BranchPythonOperator
from airflow.operators.bash import BashOperator
from datetime import datetime
from random import randint

def _choose_best_model(ti):
  accuracies = ti.xcom_pull(task_ids=[
    'training_model_A',
    'training_model_B',
    'training_model_C'
  ])
  if max(accuracies) > 8:
    return 'is_accurate'
  return 'is_inaccurate'

def _training_model(model):
  print(model)
  return randint(1, 10)

with DAG("my_dag",
  start_date=datetime(2023, 1 ,1),
  schedule_interval='@daily',
  catchup=False):

  training_model_tasks = [
    PythonOperator(
      task_id=f"training_model_{model_id}",
      python_callable=_training_model,
      op_kwargs={
        "model": model_id
      }
    ) for model_id in ['A', 'B', 'C']
  ]

  choose_best_model = BranchPythonOperator(
    task_id="choose_best_model",
    python_callable=_choose_best_model
  )

  accurate = BashOperator(
    task_id="is_accurate",
    bash_command="echo 'accurate'"
  )

  inaccurate = BashOperator(
    task_id="is_inaccurate",
    bash_command=" echo 'inaccurate'"
  )

  training_model_tasks >> choose_best_model >> [is_accurate, is_inaccurate]
That’s it you’ve just created your first Airflow DAG! If you want to test it, create a file my_dag.py with the code in it and put that file into the folder dags/ of Airflow. Once you’ve done that, run it from the UI and you see something like that:
Create your first DAG in action!
Conclusion
That’s it about creating your first Airflow DAG. It wasn’t too difficult, isn’t it? You’ve learned how to create a DAG, generate tasks dynamically, choose one task or another with the BranchPythonOperator, share data between tasks, and define dependencies with bitshift operators. If you want to learn more about Apache Airflow, check my course here, have a wonderful day, and see you for another tutorial! 👋