
Airflow Sensors are one of the most common tasks in data pipelines. Why? Because a Sensor waits for a condition to be true to complete. Do you need to wait for a file? Check if an SQL entry exists? Delay the execution of a DAG? That’s the few possibilities of the Airflow Sensors. If you want to make complex and robust data pipelines, you have to understand how Sensors work genuinely. Well, guess what? That’s precisely what you will discover now. By the way, if you are new to Airflow, check my course here, at a special discount. Ready? Let’s go!
Use Case
As a good example worth 10,000 words, let’s illustrate why Sensors are important for you.
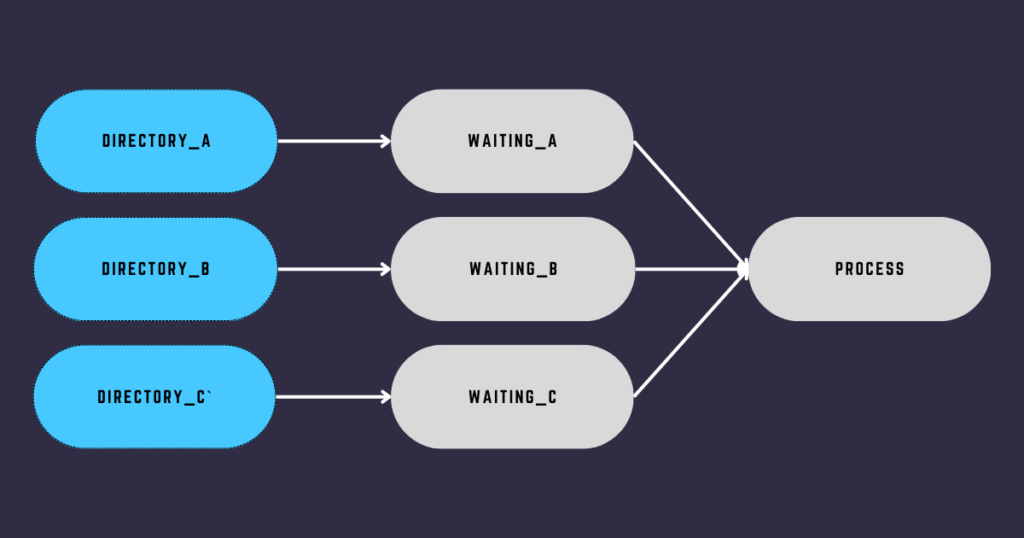
Suppose you need to wait for data coming from different sources A, B, and C, every day. A sends you data at 9:00 AM, B at 9:30 AM, and C and 10:00 AM. Hoping without delay, but we will come back to this later. Therefore, you must wait for all files to be available before moving to the process task. How do you do that?
When you’re unaware of Sensors, the naive way is to use the PythonOperator. You create a Python function, create the loop that waits for a file, and call the function with the PythonOperator. This is the worst way to do it. Please don’t do this; forget about it. It will be a nightmare to maintain and you skip what Airflow offers you. So what’s the solution?
Airflow Sensors! 😎
Airflow Sensors
What is a Sensor? A Sensor is an operator checking if a condition is met at a given time interval. If yes, it succeeds, if not, it retries until it times out. Let’s say you want to verify whether or not a file exists. You can use the FileSensor, which checks every 30 seconds if a file exists at that location. If yes, it succeeds otherwise, it will time out after 7 days by default. It is as simple as that. Do you need to wait for something? Use an Airflow Sensor.
Airflow brings many sensors, here is a non-exhaustive list of the most commonly used:
- The FileSensor: Waits for a file or folder to land in a filesystem.
- The S3KeySensor: Waits for a key in a S3 bucket.
- The SqlSensor: Runs a SQL statement repeatedly until a criteria is met.
- The HivePartitionSensor: Waits for a partition to show up in Hive.
- The ExternalTaskSensor: Waits for a different DAG or a task in a different DAG to complete for a specific execution date. (Pretty useful that one 🤓 )
- The DateTimeSensor: Waits until the specified DateTime (Useful to add some delay to your DAGs)
- The TimeDeltaSensor: Waits for a time delta after the task’s execution_date + schedule interval (Looks similar to the previous one no?)
And more!
You can take a look at the list of Core Sensors available here. The S3KeySensor, HivePartitionSensor, and so on, are in their Amazon and Hive providers, respectively.
Regardless of the Sensor, they all inherit from the BaseSensorOperator class. That means they share common attributes that you are about to discover now!
The Airflow Sensor King
To truly understand Sensors, you must know their base class, the BaseSensorOperator.
When you add a Sensor, the first step is to define the time interval that checks the condition. Every 60 seconds by default. For that, modify the poke_interval parameter that expects a float as shown below:
waiting_for_file = FileSensor(
  task_id='waiting_for_file',
  poke_interval=30
)
The code above uses the FileSensor that verifies if a file exists (no file is specified yet) every 30 seconds. You may wonder, what’s the best value to put here? Is there an optimal value for it? Well, there is no right or wrong answer to that. The shorter the poke interval, the faster the check and the task completion. But, be careful. If it is too short, there is no guarantee that Airflow will be able to evaluate each interval in time, and you may pressure the scheduler.
Ultimately it depends on your condition and the behavior of what you are waiting for. For instance, checking if a record exists in an SQL Table means creating a new connection at each interval with network latency. Or if you know the total wait time will be 30 minutes, there is no need for a Sensor to check a condition every 60 seconds (the default). My recommendation; define a meaningful value. Under the hood, the poke process is a loop verifying your condition with a sleep in it.
Speaking of the time interval, what if the file never comes?
Pools and Concurrency
Easy to forget but super important! You should always define a timeout for your Airflow Sensors. ALWAYS. Why? Let me give you an example. But first, let’s step back to understand what happens when a task runs with Airflow.
In Airflow, all operators share a common pool called “default_pool”. If you go to Admin -> Pools, here is what you get:
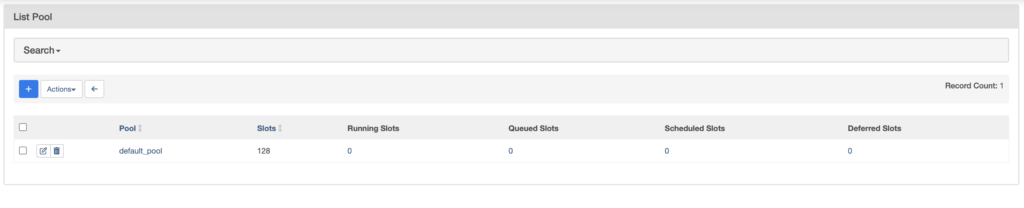
Airflow pools help to limit the execution parallelism on arbitrary sets of tasks. Each time a task is running, a slot is taken until the execution completes. After that, the Scheduler releases the slot again for another task to run. Regardless of the resources a task needs, it’s always one task one slot (unless specified differently).
If there are no more slots available, the tasks will be queued. If you keep having new tasks coming while there are no more slots, then the number of queued slots will increase. By default, you can execute a maximum of 128 tasks at the same time since the default pool has 128 slots. Increasing or decreasing this number depends on your resources and the way you share your Airflow instance with other teams, projects, etc.
In addition, the maximum number of task instances allowed to run concurrently in each DAG is 16 by default. Per DAG, not DAG run.
Now, what’s the relation with the Sensor timeout?
The Deadlock
The timeout parameter defines the maximum number of seconds a Sensor is allowed to run for. It is not a timeout for each poke interval but for the whole Sensor execution process. This timeout is set to 7 days or 60 * 60 * 24 * 7 seconds by default. Let’s take a few seconds to understand why it can be a big deal for you. Back to your data pipeline:

Image your DAG runs every day at midnight but the files from sources A, B, and C, never come. Also, the maximum number of running tasks for that DAG is limited to 12 (max_active_tasks_per_dag=12). Now, what do you think will happen?
- Day 1: DAG Run 1, Tasks A, B, and C are polling, and 3 tasks/slots are occupied—9 slots left.
- Day 2: DAG Run 2, Tasks A, B, and C are polling, 3 tasks/slots are occupied, 6 in total—6 slots left.
- Day 3: DAG Run 3, Tasks A, B, and C are polling, 3 tasks/slots are occupied, 9 in total—3 slots left.
- Day 4: DAG Run 4, Tasks A, B, and C are polling, 3 tasks/slots are occupied, 12 in total—0 slots left.
- Day 5: DAG Run 5, No more slots available -> Deadlock! 😱
That’s right. You can’t run any new tasks until a Sensor times out. That’s the Sensor deadlock. With the concurrency limit of 12, all slots are occupied by your sensors, and you can’t execute any more tasks. Now you may say, “Wait, isn’t the job of the timeout to deal with that?” It is! But it’s seven days by default. Therefore, you have to wait two more days before being able to execute new tasks again.
Airflow Sensor timeout
Always, always define a meaningful timeout for your Sensors. Always. It has to be shorter than the schedule interval of your DAG and corresponds to the time range in which you expect to have your condition met. For example, if your DAG runs once a day at 8 AM, and your files should land at 08:10 AM, a timeout set to 30 minutes might be a good idea. That will prevent you from the Sensor Deadlock issue.
waiting_for_file = FileSensor(
  task_id='waiting_for_file',
  poke_interval=30,
  timeout=60 * 30
)
Okay, with the poke_interval and the timeout defined to avoid deadlocks. What else? Do you know you can optimize your sensor further by specifying a mode?
Sensor modes
A sensor has two modes. “poke”, which is the mode by default, means that when a sensor runs it takes a slot for its whole execution time and sleeps between pokes. In other words, it takes a slot until it gets completed. Remember the previous example? That’s why you end up with a deadlock. Because more and more sensors are taking up all of your slots and they keep running even when they are NOT poking (between each poke_interval). The truth is, 99% of the time, a sensor does nothing but sleep (That’s why you should always use deferrable operators but that’s for another article). To avoid having your slot on hold for the duration of a sensor, you can use the “reschedule” mode.
With the “reschedule” mode, the Scheduler releases the slot between each poke_interval, when the sensor is not checking your condition anymore, it gets the “up_for_reschedule” state. Other tasks can run during that time. “up_for_reschedule” means your sensor will be rescheduled later, or more specifically, at the current date + poke_interval. However, there is no guarantee! Indeed, if no more slots are available, your sensor, like any other task, will have to wait until a slot is released.
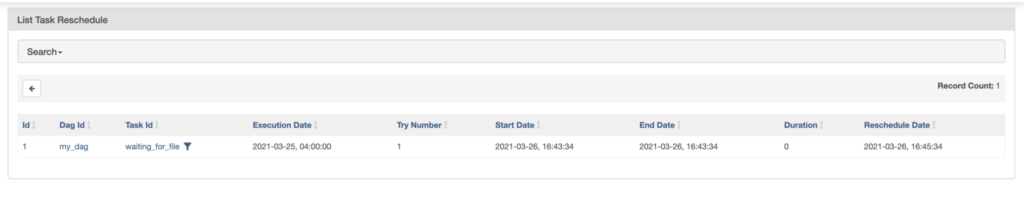
You can check your Sensors in “up_for_reschedule” in Browse -> Task Reschedules. Notice the rescheduled date.
Which mode should you use? If your poke_interval is very short (less than 5 minutes), use the poke mode. Using reschedule mode, in this case, can overload your scheduler. For longer than 5 minutes, use the reschedule mode.
waiting_for_file = FileSensor(
  task_id='waiting_for_file',
  poke_interval=120,
  timeout=60 * 30,
  mode='reschedule'
)
What if an Airflow Sensor times out?
It’s great to define a timeout for your Sensors but it’s better to know when that happens. Well, good news! You can define a callback in case a Sensor fails. Let me show you an example:
from airflow.exceptions import AirflowSensorTimeout

def _failure_callback(context):
  if isinstance(context['exception'], AirflowSensorTimeout):
    print(context)
    print("Sensor timed out")

with DAG(...):

  waiting_for_file = FileSensor(
    task_id='waiting_for_file',
    poke_interval=120,
    timeout=60 * 30,
    mode='reschedule',
    on_failure_callback=_failure_callback
)
In the code above, as soon as the FileSensor times out, the Scheduler runs _failure_callback with the task instance context object in the parameter. This context object contains useful information about your dag, task, etc. In that case, you can check for the key exception and filter on it. If the exception is equal to the AirflowSensorTimeout then your Sensor timed out.
Notice that the Scheduler doesn’t use the callback if your Airflow Sensor is skipped!
Wait what?! Skipped?
Soft fail or skip your Sensor?
Once a time-out occurs, you can either mark the sensor as failed or skipped.
Whether to choose one or the other depends on your use case. Let’s say you have multiple sensors waiting for different files, and if one file is unavailable, you still want to process the others. Skipping that sensor might be a good idea, as it won’t stop your DAG from moving on with the next task. Remember that when a task fails, the DAG run fails.
Don’t forget that when you skip a task, all downstream tasks will also be skipped. Therefore, you may need to change the trigger rules of the tasks that depend on your Sensor.
Here is a complete example:
from airflow.decorators import dag, task
from airflow.sensors.python import PythonSensor
from airflow.exceptions import AirflowSensorTimeout, AirflowFailException
from datetime import datetime

def _done():
  pass

def _partner_a():
  return False

def _partner_b():
  return True

def _failure_callback(context):
  if isinstance(context['exception'], AirflowSensorTimeout):
    print(context)
    print("Sensor timed out")

@dag(
  start_date=datetime(2023, 1, 1),
  schedule='@daily',
  catchup=False
)
def my_dag():

  waiting_for_a = PythonSensor(
    task_id='waiting_for_a',
    poke_interval=120,
    timeout=10,
    mode='reschedule',
    python_callable=_partner_a,
    on_failure_callback=_failure_callback,
    soft_fail=True
  )

  waiting_for_b = PythonSensor(
    task_id='waiting_for_b',
    poke_interval=120,
    timeout=10,
    mode='reschedule',
    python_callable=_partner_b,
    on_failure_callback=_failure_callback,
    soft_fail=True
  )

  @task(trigger_rule='none_failed_min_one_success')
  def done():
    pass

  [waiting_for_a, waiting_for_b] >> done()

my_dag()
Notice the trigger rule of the task done to say that all parents haven’t failed and at least one parent has succeeded.
All right, there is one last parameter you don’t know yet.
Exponential backoff or retry your sensors cleverly
There is a little-known but useful parameter that all sensors have, exponential_backoff.
This parameter expects a boolean value and allows progressive longer waits between pokes by using the exponential backoff algorithm. In general, retrying a task with exponential backoff is clever as the Sensor will wait longer for each new try. That avoids “hammering” external systems such as databases or APIs. Especially if you have a lot of Sensors running. Should you always use it with your Sensors? It depends. Remember that each “poke” will be more delayed than the previous one, which may slow the execution of your tasks/DAGs.
Again, there is no golden rule here. Try and learn 😁
The ExternalTaskSensor
Before finishing this tutorial, I couldn’t leave you without discussing the ExternalTaskSensor. Hold on tight, this special Airflow Sensor allows you to create DAG dependencies 🤯
Yes, you heard it right. If you want to execute DAG B when a task in DAG A is done, you can do that with the ExternalTaskSensor. That Sensor allows you to wait for a task to complete in another DAG before getting itself completed. Want to learn more? I made a video about it:
Airflow Sensors in action!
If you want to see the Sensors in action, I made the following video for you:
Conclusion
Finally! You’re done with Airflow Sensors. It was a pretty long tutorial, wasn’t it? Airflow Sensors are super important to understand as they allow you to make more complex data pipelines that solve common use cases. I hope now you have a better idea of how they work and what you can do with them. If you want to learn more about Airflow, go check my course The Complete Hands-On Introduction to Apache Airflow right here. Or if you already know Airflow and want to go way further, enroll in my 12 hours course here.
Have a great day! 😁