
An Airflow TaskGroup helps make a complex DAG easier to organize and read. Airflow taskgroups are meant to replace SubDAGs, the historical way of grouping your tasks. Indeed, SubDAGs are too complicated only for grouping tasks. They bring a lot of complexity as you must create a DAG in a DAG, import the SubDagOperator (which is a sensor), define the parameters correctly, and so on. As of today, SubDAGs are deprecated, and you should stop using them. If you are new to Airflow, check out my course here; you will get it at a special discount. Ready? Let’s go!
Use Case
To better illustrate a concept, let’s begin with a use case:
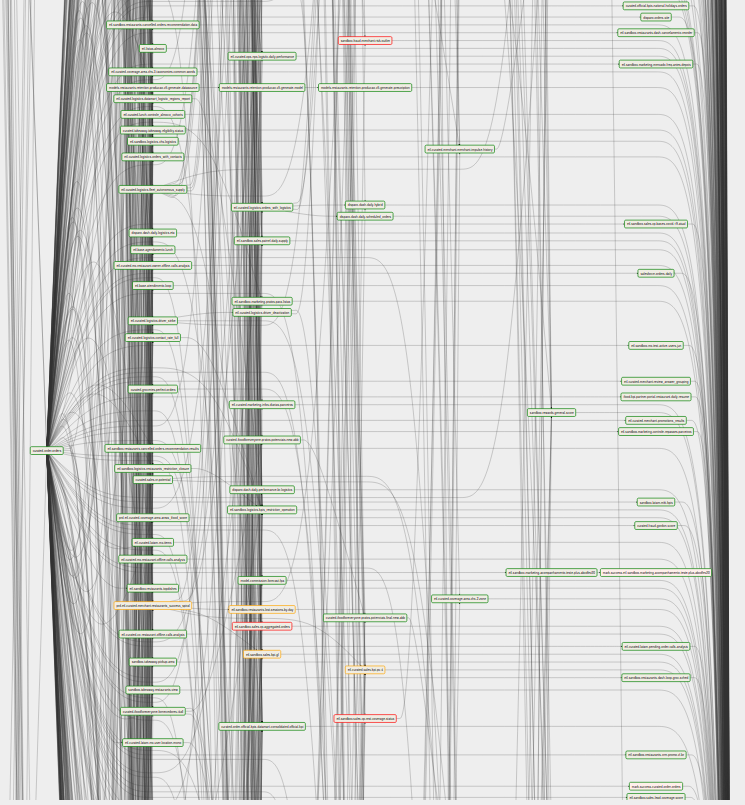
In this tutorial, we will use taskgroups to organize the giant DAG above. Amazing, isn’t it?
I’m kidding. 🥹
But you get the point. With taskgroups, you can:
- Apply default arguments to a set of tasks.
- Turn task groups into modules to reuse them in different DAGs.
- Visually group tasks to organize complex data pipelines.
Let’s take another example:
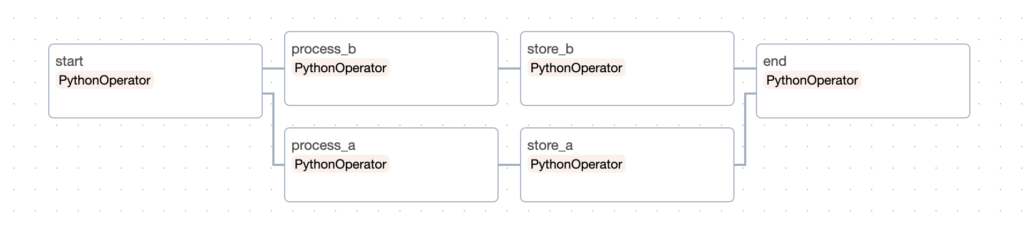
In the DAG above, you have two paths a and b that run the same steps process and store. When you end up with in this situation, you have four solutions:
- Keeping the DAG as it is, but it can quickly become more and more complex.
- Grouping the tasks per step (
processandstore) - Grouping the tasks per path (
aandb)
How you group your tasks is a matter of preference rather than a technical question. As a best practice, you should group tasks with a common attribute (same source/actions etc.)
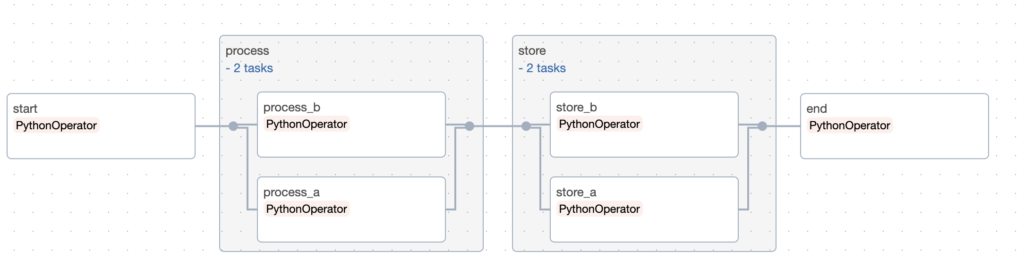
For this example, your goal is to end up with a DAG like this:

and if you expand the taskgroups:
With the example in mind, let’s find out how to do it!
What is an Airflow Taskgroup?
A taskgroup is a collection of closely related tasks in a DAG visually grouped on the user interface.
Unlike SubDAGs where you had to create a DAG, a TaskGroup is only a visual-grouping feature in the UI. Therefore, Taskgroups are lightweight and easy to use.
There are two ways to define a taskgroup:
- The
TaskGroupclass - The
@task_groupdecorator (Taskflow API)
Which one to use depends on your personal preferences and use cases.
With the class:
from airflow.utils.task_group import TaskGroup

with DAG(...):

  with TaskGroup('process') as process:
    task_process_a = PythonOperator(
      task_id='process_a',
      python_callable=lambda: print('process_a'),
    )

    task_process_b = PythonOperator(
      task_id='process_b',
      python_callable=lambda: print('process_b'),
    )
With the taskgroup decorator:
from airflow.decorators import task_group

with DAG(...):

  @task_group(group_id='my_task_group')
  def tg():
    task_process_a = PythonOperator(
      task_id='process_a',
      python_callable=lambda: print('process_a'),
    )

    task_process_b = PythonOperator(
      task_id='process_b',
      python_callable=lambda: print('process_b'),
    )

  tg()
To generate taskgroups based on unknown inputs with dynamic task mapping, you must use the @task_group decorator instead of the class.
When to use an Airflow Taskgroup?
Here is a list of a few airflow taskgroup examples:
- Visually better organize complex DAGs
- Grouping tasks per machine learning model
- Creating reusable sets of tasks in different DAGs
- Applying default arguments to sets of tasks
- Colocating dbt models and dbt tests with Astronomer Cosmos
- Generating groups based on unknown inputs with dynamic task mapping.
Airflow taskgroup parameters
There are a few parameters to know with task groups
group_id
The group_id parameter is the unique identifier of a Taskgroup. It has to be meaningful as you will see it on the user interface but not only… (teasing 😉)
Look at the following code:
with TaskGroup(group_id='processes') as group_processes:
  task_process_a  = BashOperator(task_id='task_process_a', bash_command='exit 0')
It shows like that on the user interface:

Notice that group_processes corresponding to the Taskgroup’s instance object doesn’t impact the group’s name on the UI. It is used only in the code to define the dependencies for example.
In addition, make sure that the group_id is unique. It must not conflict with the group_id of another Taskgroup or the task_id of another task. Otherwise, you will get an error.
Finally, you must define the group_id. It’s a required positional argument that expects a String made of alphanumeric characters, dashes, and underscore exclusively no longer than 200 characters. However, it can be set to None only if the Taskgroup is a root Taskgroup.
What is a root Taskgroup? It’s a task group with no group_id and no parents. By default, every DAG has a root task group. This matters when you nest multiple task groups as you will see later in the tutorial.
prefix_group_id
Remember when I said that the group_id is not only used on the UI? Well, this is it. In addition to the group_id, another parameter that you can use is prefix_group_id. This parameter adds the group_id as a prefix for all tasks within the airflow taskgroup.
For example, the tasks that belong to the taskgroup below have the task ids process.process_a and process.process_b:
from airflow.utils.task_group import TaskGroup

with DAG(...):

  with TaskGroup('process') as process:
    task_process_a = PythonOperator(
      task_id='process_a',
      python_callable=lambda: print('process_a'),
    )

    task_process_b = PythonOperator(
      task_id='process_b',
      python_callable=lambda: print('process_b'),
    )
However, you don’t see the prefix on the user interface but if you list the tasks of your DAG with airflow tasks list <dag_id>, you will get the ids with the prefix.
Pay attention when you mix taskgroups with XCOMs or a BranchOperator. Either way, you get an error if you forget to add the prefix to the task ids in the task group.
As a best practice, I recommend keeping this parameter to True (by default) as it reduces many of the risks of conflicts between your task ids, especially with nested task groups. That’s why it’s even more critical to define a meaningful group id.
Airflow Taskgroup default arguments
Wouldn’t applying default arguments to all tasks within a TaskGroup would be nice? Imagine that you have some pretty resource-consuming tasks grouped in the same Taskgroup. Therefore, you would like to execute one task at a time, but only for this group.
Can you do that? Of course, you can!
With Airflow Taskgroups you can define a dictionary of default parameters that will be applied for every task within the group. This dictionary overrides the default dictionary (if any) defined at the DAG level.
Let me give you an example:
DEFAULT_ARGS = {
  'pool': 'general'
}

with DAG('my_dag',
schedule_interval='@daily',
start_date=datetime(2023, 1, 1),
catchup=False,
default_args=DEFAULT_ARGS):
  start = BashOperator(task_id='start', bash_command='exit 0')

  with TaskGroup(group_id='processes', default_args={'pool': 'sequential'}) as group:
    task_process_a  = BashOperator(task_id='task_process_a', bash_command='exit 0')
    task_process_b  = BashOperator(task_id='task_process_b', bash_command='exit 0')
In the example above, you define the default arguments at the DAG level with pool=general. That means Airflow will run the tasks with the pool “general”. Since another set of default arguments exists at the Taskgroup level (look at the parameter default_args of the Taskgroup), the tasks within the group will use “sequential” instead of “general”. This is an example with pools but you can use any other arguments such as failure_callback, retries, etc.
Nested Airflow Taskgroups
What if you want to create a taskgroup in a taskgroup? Or create multiple taskgroups in a taskgroup?
Suppose you have two “paths” with the same steps to process and store data from two sources. You might want a DAG like this:
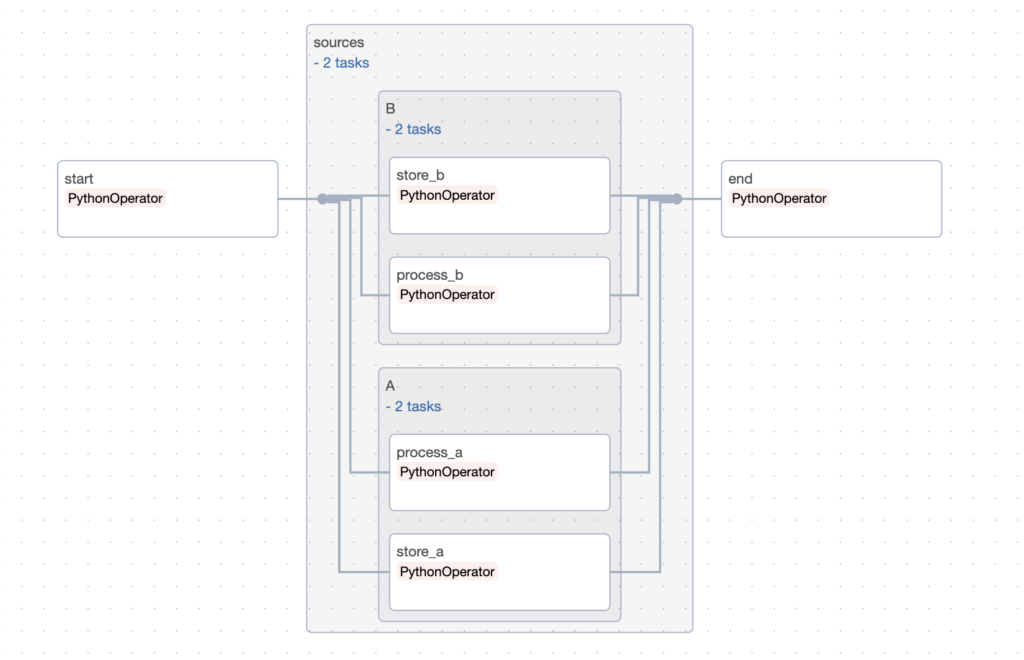
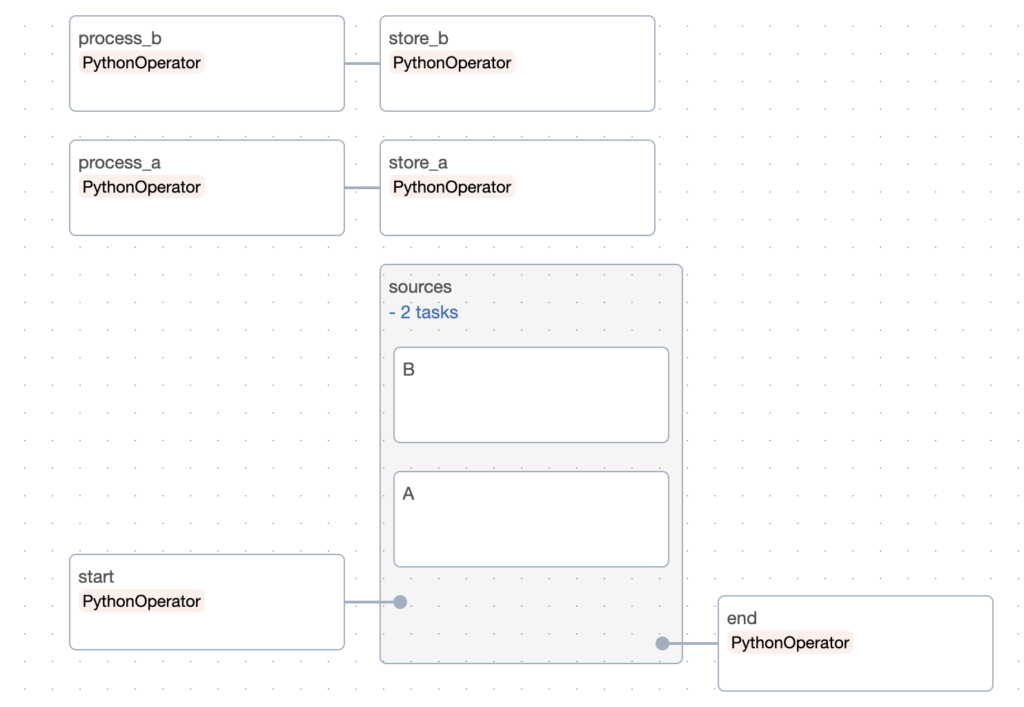
You can see in the DAG above that the two task groups A and B are in the taskgroup sources. When you close all taskgroups, you get the following DAG:

Nice and clean isn’t it?
Here is the corresponding code:
from airflow import DAG
from airflow.models.baseoperator import chain
from airflow.utils.task_group import TaskGroup
from airflow.operators.python import PythonOperator
from datetime import datetime

with DAG('taskgroup',
  start_date=datetime(2023, 1, 1),
  schedule='@daily',
  catchup=False):

    start = PythonOperator(
        task_id='start',
        python_callable=lambda: print('start'),
    )

    with TaskGroup('sources') as sources:

        with TaskGroup('A') as a:
            task_process_a = PythonOperator(
                task_id='process_a',
                python_callable=lambda: print('process_a'),
            )
            task_store_a = PythonOperator(
                task_id='store_a',
                python_callable=lambda: print('store_a'),
            )

        with TaskGroup('B') as b:
            task_process_b = PythonOperator(
                task_id='process_b',
                python_callable=lambda: print('process_b'),
            )

            task_store_b = PythonOperator(
                task_id='store_b',
                python_callable=lambda: print('store_b'),
            )

    end = PythonOperator(
        task_id='end',
        python_callable=lambda: print('end'),
    )

    chain(start, sources, end)
As far as I know, there is no hard limit regarding how deep you can go with nested taskgroups. However, I wouldn’t go beyond three levels.
Airflow Taskgroup dependencies
Taking the previous DAG example, how can you define dependencies in the task groups so that process tasks run before the store tasks?
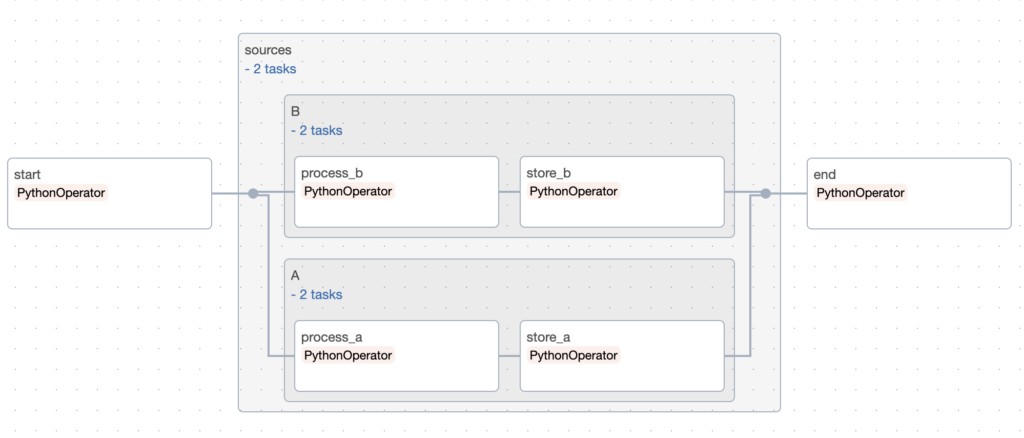
Simple, define the dependencies in the taskgroups:
from airflow import DAG
from airflow.models.baseoperator import chain
from airflow.utils.task_group import TaskGroup
from airflow.operators.python import PythonOperator
from datetime import datetime

with DAG('taskgroup',
  start_date=datetime(2023, 1, 1),
  schedule='@daily',
  catchup=False):

    start = PythonOperator(
        task_id='start',
        python_callable=lambda: print('start'),
    )

    with TaskGroup('sources') as sources:

        with TaskGroup('A') as a:
            task_process_a = PythonOperator(
                task_id='process_a',
                python_callable=lambda: print('process_a'),
            )
            task_store_a = PythonOperator(
                task_id='store_a',
                python_callable=lambda: print('store_a'),
            )

            task_process_a >> task_store_a

        with TaskGroup('B') as b:
            task_process_b = PythonOperator(
                task_id='process_b',
                python_callable=lambda: print('process_b'),
            )

            task_store_b = PythonOperator(
                task_id='store_b',
                python_callable=lambda: print('store_b'),
            )

            task_process_b >> task_store_b

    end = PythonOperator(
        task_id='end',
        python_callable=lambda: print('end'),
    )

    chain(start, sources, end)
parent_group
Little secret, you don’t have to put a task group in a task group to nest them. Another way is with the parent_group parameter.
  with TaskGroup('sources') as sources:
    pass

  with TaskGroup('A', parent_group=sources) as a:
    task_process_a = PythonOperator(
      task_id='process_a',
      python_callable=lambda: print('process_a'),
    )
    task_store_a = PythonOperator(
      task_id='store_a',
      python_callable=lambda: print('store_a'),
    )

    task_process_a >> task_store_a

  with TaskGroup('B', parent_group=sources) as b:
      task_process_b = PythonOperator(
          task_id='process_b',
          python_callable=lambda: print('process_b'),
      )
      task_store_b = PythonOperator(
          task_id='store_b',
          python_callable=lambda: print('store_b'),
      )

      task_process_b >> task_store_b
This code gives the same DAG as the previous one using the parent_group parameter.
Taskgroup with the context manager
You must know that you can create task groups without the context manager “with”.
For example:
with DAG(...):

  start = PythonOperator(
      task_id='start',
      python_callable=lambda: print('start'),
  )

  sources = TaskGroup('sources')

  a = TaskGroup('A', parent_group=sources)

  task_process_a = PythonOperator(
      task_id='process_a',
      python_callable=lambda: print('process_a'),
  )
  task_store_a = PythonOperator(
      task_id='store_a',
      python_callable=lambda: print('store_a'),
  )

  task_process_a >> task_store_a

  b = TaskGroup('B', parent_group=sources)

  task_process_b = PythonOperator(
      task_id='process_b',
      python_callable=lambda: print('process_b'),
  )

  task_store_b = PythonOperator(
      task_id='store_b',
      python_callable=lambda: print('store_b'),
  )

  task_process_b >> task_store_b

  end = PythonOperator(
      task_id='end',
      python_callable=lambda: print('end'),
  )

  chain(start, sources, end)
If you try this DAG you will see that:
The problem is that Airflow doesn’t know to which taskgroup the different tasks belong. As you don’t use a context manager, indentation doesn’t anymore. You need to explicitly indicate that a task belongs to a task group with the task_group parameter.
Here is the code fixed:
with DAG(...):

  start = PythonOperator(
      task_id='start',
      python_callable=lambda: print('start'),
  )

  sources = TaskGroup('sources')

  a = TaskGroup('A', parent_group=sources)

  task_process_a = PythonOperator(
      task_id='process_a',
      python_callable=lambda: print('process_a'),
      task_group=a,
  )
  task_store_a = PythonOperator(
      task_id='store_a',
      python_callable=lambda: print('store_a'),
      task_group=a,
  )

  task_process_a >> task_store_a

  b = TaskGroup('B', parent_group=sources)

  task_process_b = PythonOperator(
      task_id='process_b',
      python_callable=lambda: print('process_b'),
      task_group=b,
  )

  task_store_b = PythonOperator(
      task_id='store_b',
      python_callable=lambda: print('store_b'),
      task_group=b,
  )

  task_process_b >> task_store_b

  end = PythonOperator(
      task_id='end',
      python_callable=lambda: print('end'),
  )

  chain(start, sources, end)
How to generate Airflow taskgroups dynamically?
As you might know, in Airflow you can generate tasks using loops, so you don’t have to write the tasks repeatedly. A simple use case is when having different sources but the same steps. You will generate the tasks in a loop while going through the list of sources.
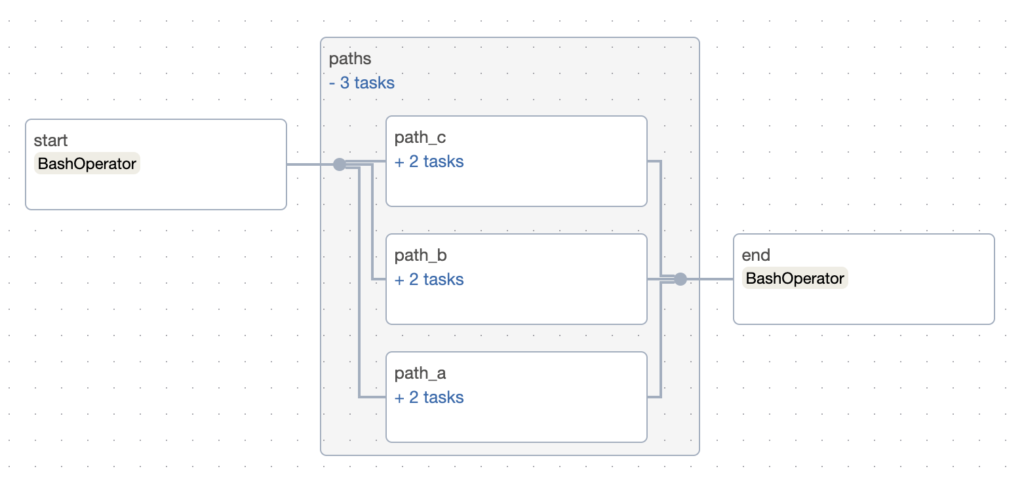
Let’s say you want to generate three task groups with two tasks for each one. Here is how to do it:
start = BashOperator(task_id='start', bash_command='exit 0')
with TaskGroup(group_id='paths') as paths:
  for gid in {'a', 'b', 'c'}:
    with TaskGroup(group_id=f'path_{gid}') as path:
      task_process  = BashOperator(task_id=f'task_process_{gid}', bash_command='exit 0')
      task_store  = BashOperator(task_id=f'task_store_{gid}', bash_command='exit 0')
      task_process >> task_store
end = BashOperator(task_id='end', bash_command='exit 0')
start >> paths >> end
This code gives:
What if you want to execute path_a, path_b, and path_c in this order?
start = BashOperator(task_id='start', bash_command='exit 0')
  with TaskGroup(group_id='paths') as paths:
    previous = None
    for gid in {'a', 'b', 'c'}:
      with TaskGroup(group_id=f'path_{gid}') as path:
        task_process = BashOperator(task_id=f'task_process_{gid}', bash_command='exit 0')
        task_store = BashOperator(task_id=f'task_store_{gid}', bash_command='exit 0')
        task_process >> task_store
      if previous:
        previous << path
      previous = path
  end = BashOperator(task_id='end', bash_command='exit 0')
  start >> paths >> end
The Taskgroup factory
To add reusability and modularity, you can create a taskgroup factory. This function returns a task group (or multiple task groups) based on inputs.
This is useful when you have the same pattern across different DAGs and you don’t want to copy and paste the same code everywhere.
First, create a new file factory_task_group.py. Put this file in another folder like “include” that is not in your folder “dags“. Like that:

Copy and paste the following code:
from typing import List
from airflow import DAG
from airflow.utils.task_group import TaskGroup
from airflow.operators.bash import BashOperator

def make_taskgroup(dag: DAG, sources: List[str]) -> TaskGroup:
  with TaskGroup(group_id='paths', dag=dag) as paths:
    previous = None
    for gid in sources:
      with TaskGroup(group_id=f'path_{gid}') as path:
        task_process = BashOperator(task_id=f'task_process_{gid}', bash_command='exit 0')
        task_store = BashOperator(task_id=f'task_store_{gid}', bash_command='exit 0')
        task_process >> task_store
      if previous:
        previous >> path
      previous = path
  return paths
This code is more or less what you’ve done in the previous section;
- You create a new Python function that returns a task group.
- That Python function expects a parameter
dagwhich the DAG the generated task group belongs to. - You can add as many parameters as you want to your function. Here we have sources which is a list of strings like
{“a”, “b”, “c”}
In your DAG, you import the factory function and you call it this way:
from include.factory_task_group import make_taskgroup

  with DAG('my_dag',
    schedule_interval='@daily',
    start_date=datetime(2022, 1, 1),
    catchup=False):

    start = BashOperator(task_id='start', bash_command='exit 0')
    paths = make_taskgroup(dag, {'e', 'f', 'g'})
    end = BashOperator(task_id='end', bash_command='exit 0')
    start >> paths >> end
Taskgroup in action!
Conclusion
As you can see, Airflow TaskGroups are extremely powerful. They are a lightweight and flexible way of grouping tasks in your DAGs that is easier than SubDAGs. Play with taskgroups you will fall in love with them!
Take care! ❤️
P.S: If you want to learn more about Airflow, go check my course The Complete Hands-On Introduction to Apache Airflow here. Or if you already know Airflow and want to go way much further, enroll in my 12 hours course here